How to Setup STM32 Blue Pill (STM32F103C8) with Rust on Linux: A Complete Guide for Beginners
The STM32F103C8 is a high-spec microcontroller that is widely available on the market. While it is commonly programmed using C or C++, this time we will explore programming it with Rust, a language renowned for its memory safety features.
This tutorial will focus on setting up the hardware and software required to program the STM32F103C8 using the Rust programming language on Linux. I am using the Fedora Linux distribution; if you are using a different Linux distro, you can adapt the steps in the *Software Setup section, which might vary slightly. This tutorial will guide you through hardware preparation, software setup, and finally, running a sample Rust program on the STM32F103C8. You can also use other STM32F103 microcontroller variants; you will simply need to adjust the linker memory (memory.x) configuration later on.
Hardware Preparation
The hardware required for this tutorial includes the STM32F103C8 (of course), an ST-LINK USB Downloader/Debugger, and several jumper wires (female-to-female) to connect the STM32F103C8 to the ST-LINK.
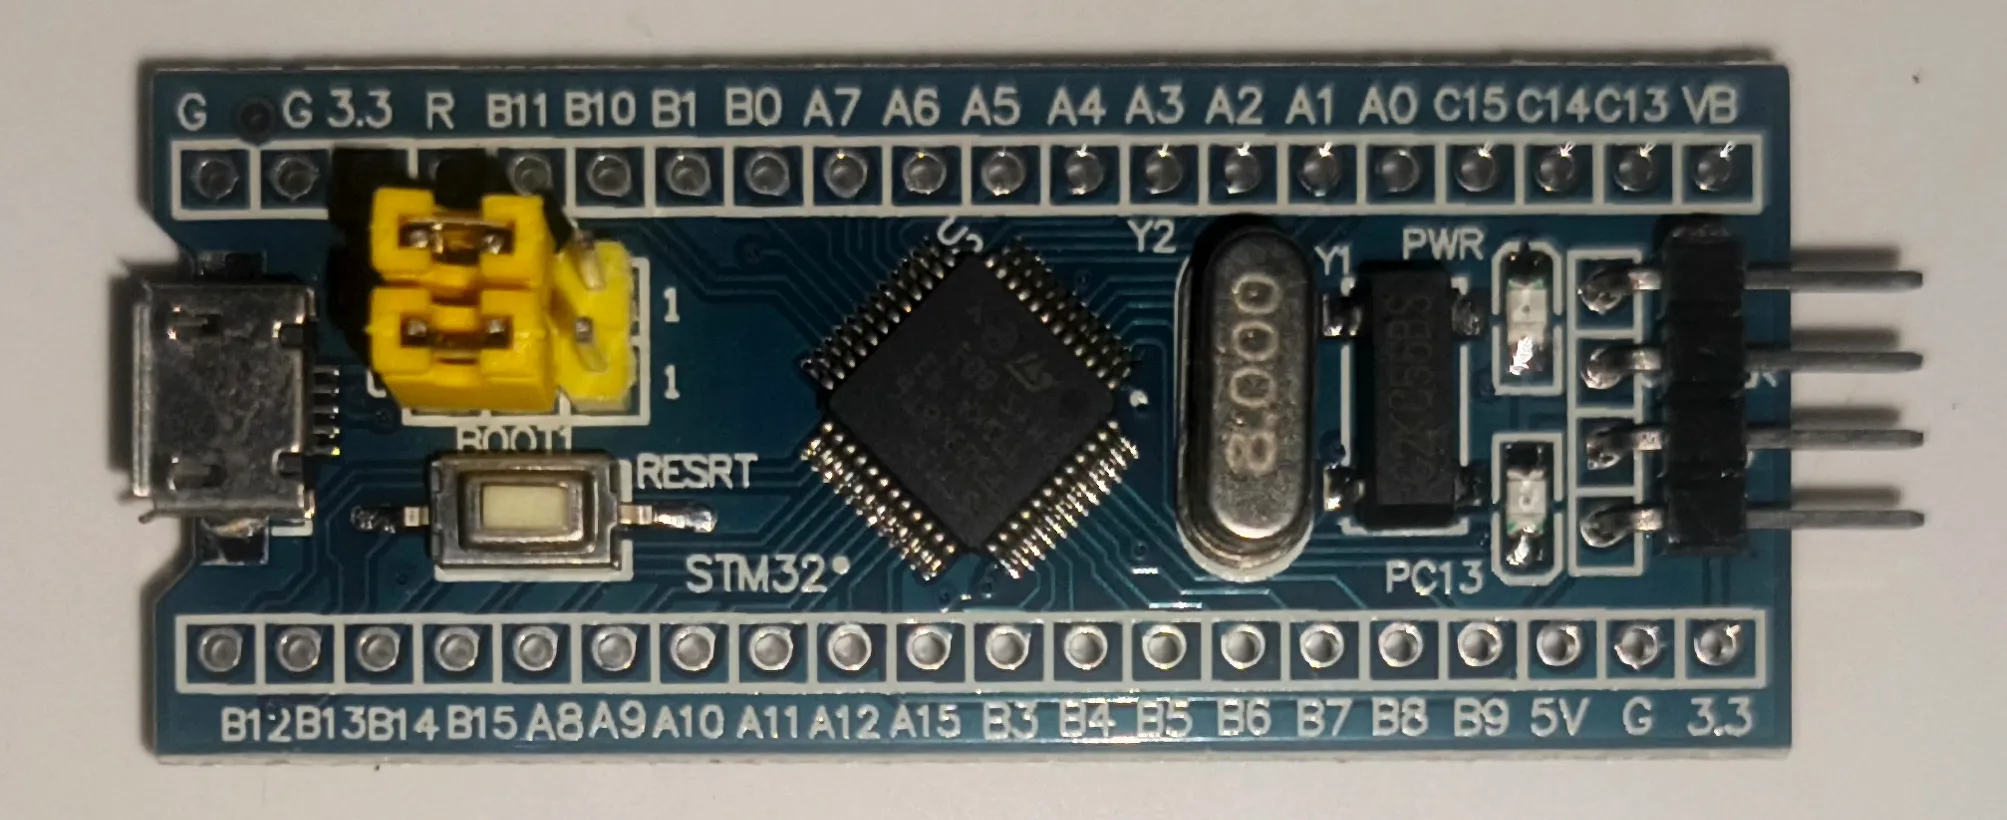
Microcontroller STM32F103C8 (Blue Pill)
The STM32F103C8 (Blue Pill) is a microcontroller powered by a 32-bit ARM Cortex-M3 CPU, running at a frequency of up to 72MHz, featuring 20KB of SRAM, and a 64KB flash memory variant. More detailed specifications regarding the STM32F103C8 can be found on the STM32F103C8 page. In this tutorial, we will be using the STM32F103C8T6 Blue Pill minimum system development board. You can also use other boards equipped with the STM32F103C8 microcontroller, such as the older Black Pill or the Maple Mini.
ST-LINK USB Downloader Debuger
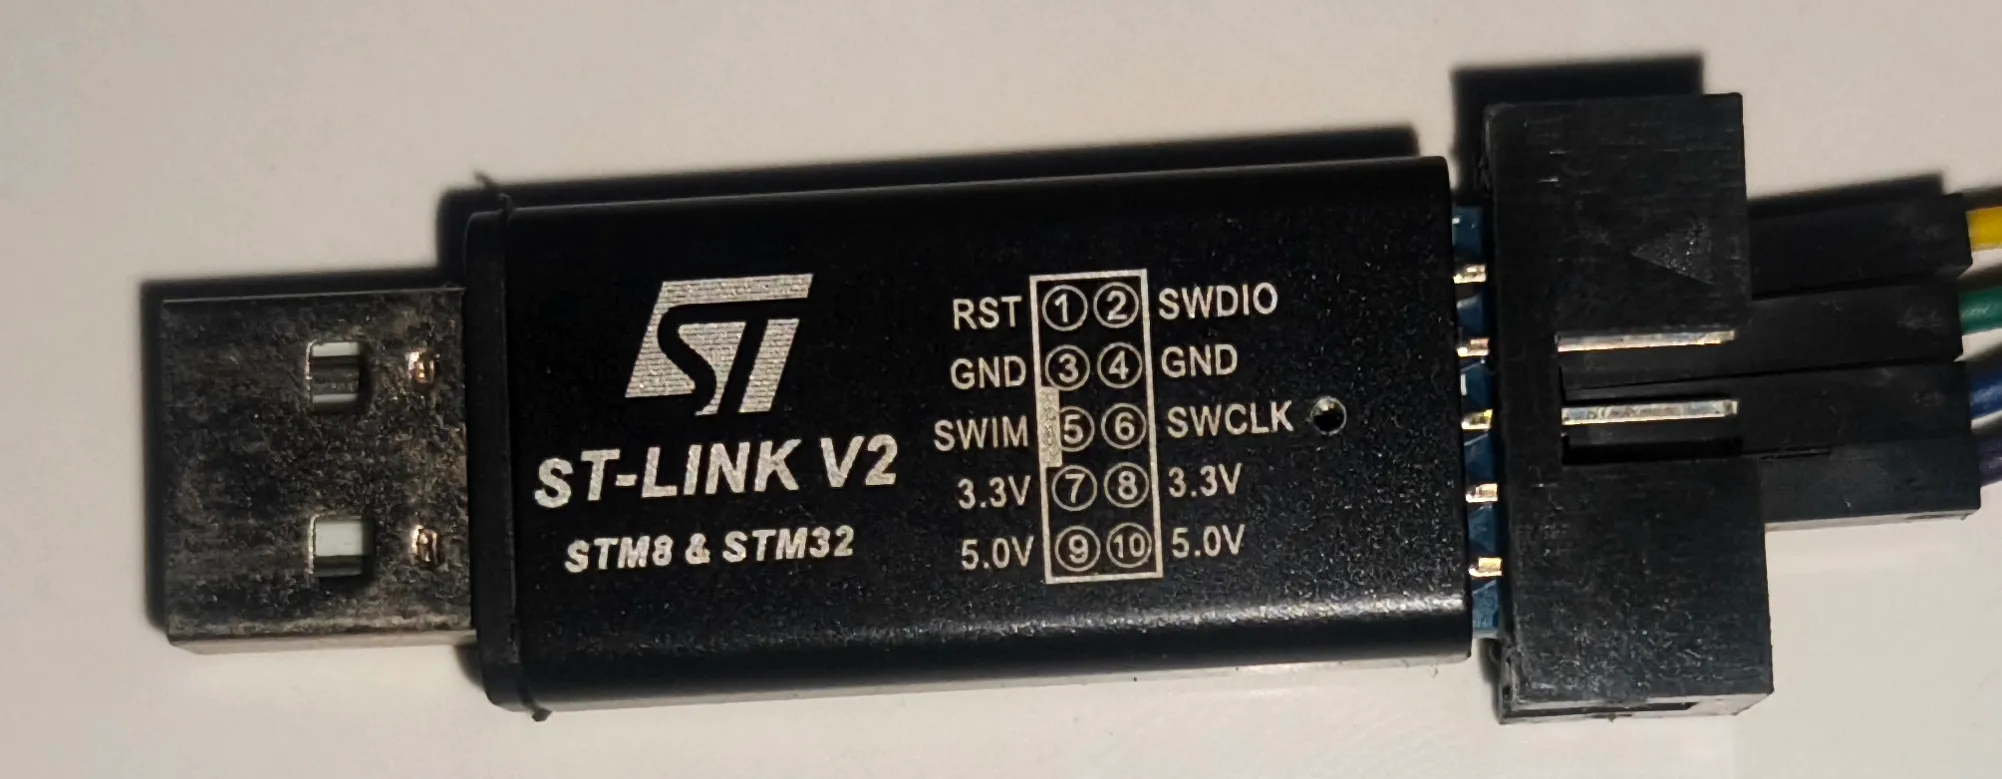
The ST-LINK USB Downloader Debugger acts as a bridge between the PC/laptop and the STM32F103C8, enabling us to program the STM32F103C8 directly from the PC/laptop. The ST-LINK USB Downloader Debugger typically utilizes Single Wire Interface Module (SWIM), Serial Wire Debugging (SWD), and JTAG interfaces to connect to the STM32F103C8. However, the ST-LINK USB Downloader Debugger I am using this time only supports SWIM and SWD interfaces, so we will be using the SWD interface.
Software Setup
oftware Setup To program the STM32F103C8 using the Rust programming language on Linux, we need to install several essential tools: the Rust toolchain to compile Rust code into binaries, VSCode as the editor for writing and editing code, and probe-rs to load the compiled binaries onto the STM32F103C8.
Installing the Rust Toolchain on Linux
The Rust toolchain acts as the compiler that transforms your written Rust code into binary files that can be executed on the STM32F103C8. To install the Rust toolchain on Linux, you can use the following command:
curl --proto '=https' --tlsv1.2 -sSf https://sh.rustup.rs | sh
This command will install rustup, cargo, rustc, and other essential components required to compile Rust code into binaries. To verify if the installation was successful, use the following command:
rustup --versionrustup 1.28.2 (e4f3ad6f8 2025-04-28)info: This is the version for the rustup toolchain manager, not the rustc compiler.info: The currently active `rustc` version is `rustc 1.90.0 (1159e78c4 2025-09-14)` Since it will be used to program the STM32F103C8, which runs on an ARM Cortex-M3 chip, the Rust toolchain needs to perform cross-compilation so that the compiled binary can be executed on the STM32F103C8. To perform cross-compilation, the Rust toolchain requires a compiler target that matches the STM32F103C8 CPU, which can be installed using the following command:
rustup target add thumbv7m-none-eabi
Verify the target installation with the following command:
rustup target list --installedthumbv7m-none-eabix86_64-unknown-linux-gnuNote: Below are the supported Rust target compilers for 32-bit ARM architectures:
- thumbv6m-none-eabi: Cortex-M0, Cortex-M0+
- thumbv7m-none-eabi: Cortex-M3
- thumbv7em-none-eabi: Cortex-M4, Cortex-M7 (without FPU)
- thumbv7em-none-eabihf: Cortex-M4F, Cortex-M7F (with FPU)
Installing VSCode on Linux
To write and edit code, I will be using Visual Studio Code (VSCode). You can also use any other code editor of your choice. To install VSCode on Fedora, you can use the following command; if you are using a different distribution, you can find the installation guide on the Install VSCode page.
sudo rpm --import https://packages.microsoft.com/keys/microsoft.asc && \echo -e "[code]\nname=Visual Studio Code\n\baseurl=https://packages.microsoft.com/yumrepos/vscode\n\enabled=1\n\autorefresh=1\n\type=rpm-md\n\gpgcheck=1\n\gpgkey=https://packages.microsoft.com/keys/microsoft.asc" \| sudo tee /etc/yum.repos.d/vscode.repo > /dev/nulldnf check-update && sudo dnf install codeNext, install the Rust Analyzer extension to assist us in writing Rust code within VSCode. This extension provides automatic autocomplete and auto-import features as you write your code.
- Open VSCode
- Select the Extenstion tab
- Search for Rust Analyzer
- Click Install
Installing probe-rs on Linux
probe-rs is a tool used to flash the compiled Rust binaries onto the STM32F103C8. To install probe-rs on Linux, you can use the following command:
curl -LsSf https://github.com/probe-rs/probe-rs/releases/latest/download/probe-rs-tools-installer.sh | shInstalling Flip-Link on Linux
flip-link functions to prevent memory corruption caused by stack overflows by flipping the memory layout on the SRAM. In a standard SRAM layout, if a stack overflow occurs (where stack memory usage exceeds its capacity), the stack will overwrite static variables. This causes the microcontroller to experience undefined behavior. By using flip-link, this issue can be avoided. To install flip-link on Linux, you can use the following command:
cargo install flip-linkProgramming the STM32F103C8 with Rust
The following are the steps that will be carried out to program the STM32F103C8 using Rust.
- Writing and Editing the Rust Source Code
- Compile Rust source code into binary
- Flash the binary to the STM32F103C8
Be sure to repeat these steps every time you make changes to your Rust code.
Creating Your First Rust Program
First, let’s create a new Rust project. Create a new folder named “hello-stm32”. Then, open VSCode, navigate to the “File” menu, click “Open Folder”, and select the “hello-stm32” folder. Next, in VSCode, go to the “Terminal” menu and click “New Terminal”. In the newly created terminal, type the following command to initialize the new Rust project:
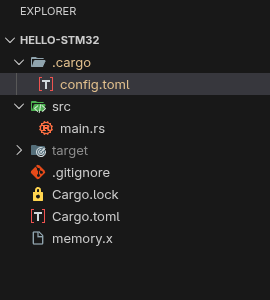
cargo init --binThe Rust project files will now appear in the “Explorer” tab. Next, create a new file named “memory.x” inside the “hello-stm32” folder, and add the following code:
1//* memory.x - Linker script for the STM32F103C8T6 */
2MEMORY
3{
4  /* Flash memory begins at 0x80000000 and has a size of 64kB or 128kB*/
5  FLASH : ORIGIN = 0x08000000, LENGTH = 64K
6  /* RAM begins at 0x20000000 and has a size of 20kB*/
7  RAM : ORIGIN = 0x20000000, LENGTH = 20K
8}
This file informs the linker about the location and size of the Flash and RAM memory on the STM32F103C8 microcontroller.
Note: I am using the STM32F103C8T6 with a 64KB flash size. If you are using a different STM32F103 microcontroller variant, please modify the FLASH LENGTH and RAM LENGTH according to its datasheet, which can be found in the Memory Mapping section.
The following are several variants of the STM32F103C:
| Varian | Flash Length | RAM Length | Density |
|---|---|---|---|
| STM32F103C4 | 16K | 6K | Low-density |
| STM32F103C6 | 32K | 10K | Low-density |
| STM32F103C8 | 64K/128K | 20K | Medium-density |
| STM32F103CB | 128K | 20K | Medium-density |
Next, configure the Rust project to perform cross-compilation for the ARM Cortex-M3 CPU so it can run on the STM32F103C8 microcontroller. Inside the hello-stm32 folder, create a new folder named “.cargo”. Then, create a new file named “config.toml” inside it and add the following code:
Toml
1# Specify CPU target
2[build]
3target = "thumbv7m-none-eabi"
Specifying the target CPU. Since the STM32F103C8 utilizes a Cortex-M3 core, we will set the target to thumbv7m-none-eabi .
Pro Tip: Below is an explanation of the Rust target triple:
thumbv7m: Indicates the CPU architecture for the Cortex-M3.none: Indicates that no operating system is used. This means the program runs directly as bare metal rather than on top of an OS.eabi: Uses the Embedded Application Binary Interface.To view all targets supported by the Rust toolchain, you can use the following command: ‘
rustup target list’.
Toml
1# Automaticly flash program to the STM32F103C8 when running the 'cargo run' command
2[target.thumbv7m-none-eabi]
3runner = ["probe-rs", "run", "--chip", "STM32F103C8Tx", "--log-format=oneline"]
Configuring the runner for the thumbv7m-none-eabi target. This configuration allows us to execute a specific command whenever ‘cargo run’ is invoked in the Rust project directory. When you run ‘cargo run’, Cargo will build the project and then automatically execute ‘probe-rs run --chip STM32F103C8Tx --log-format=oneline’ to flash the program onto the STM32F103C8 microcontroller.
Note: If you are using a different microcontroller, you can replace the ’
--chip’ parameter accordingly. You can check the complete list of microcontrollers or chips supported byprobe-rsby running the command ‘probe-rs chip list’
Setting the flags for the Rust toolchain to enable compilation for the STM32 embedded target.
Toml
 1rustflags = [
 2    "-C",
 3    "linker=flip-link",   # Using the flip-link linker to prevent undefined behavior in the event of a stack overflow.
 4    "-C",
 5    "link-arg=-Tlink.x",  # Tells the linker to use Tlink.x provided by the 'cortex-m-rt' crate.
 6    "-C",
 7    "link-arg=-Tdefmt.x", # Using specific linker instructions required by the 'defmt' crate.
 8    "-C",
 9    "link-arg=--nmagic",  # Disabling page alignment to save flash memory.
10]
Defining the Rust toolchain flags for the compilation process.
The Gihex website relies on revenue from Smartlink/Directlink advertisements for its operational costs. To display the complete code for “.cargo/config.toml”, simply click the following Smartlink/Directlink button:
UnlockNow, our Rust project structure will look like this:
Next, add the required libraries to the Rust project. Open the “Cargo.toml” file and add the following code:
 1[[bin]]
 2name = "hello-stm32"
 3path = "src/main.rs"
 4test = false # To prevent errors resulting from the absence of a test module.
 5bench = false # To prevent errors resulting from the absence of a test module.
 6
 7[dependencies]
 8# Accessing the core features of the ARM Cortex-M processor.
 9cortex-m = { version = "0.7.7", features = ["critical-section-single-core"] }
10# Setting up the program entry point and handling system errors.
11cortex-m-rt = "0.7.5"
12# Hardware Abstraction Layer (HAL) to simplify accessing STM32F103C8 features.
13stm32f1xx-hal = { version = "0.11.0", features = ["stm32f103", "medium"] }
14# For debugging to a PC/laptop terminal.
15semihosting = { version = "0.1.21", features = ["stdio"] }
16# Specific panic handler designed for use with probe-rs.
17panic-probe = { version = "1.0", features = ["print-defmt"] }
18# Formatting message for debugging
19defmt = "1.0.1"
20# Send message to the terminal PC/laptop
21defmt-rtt = "1.1.0"
22
23[profile.dev]
24opt-level = 's'
25codegen-units = 1
26
27[profile.release]
28opt-level = 'z'
29lto = true
Next up is the most anticipated part: editing the Rust source code. Open the “src/main.rs” file and add the following code:
1// Do not use the Rust standard library
2#![no_std]
3// Tells the Rust toolchain that this program does not run on an Operating System.
4#![no_main]
5
6use defmt_rtt as _;
7use panic_probe as _;
8use stm32f1xx_hal as _;
9use cortex_m_rt::entry;
10use defmt:: Format;
11
12// Creates a new struct that implements the 'Format' trait from the 'defmt' crate/library.
13#[derive(Format)]
14struct Person {
15 name: &'static str,
16 age: u8,
17}
18
19// The main function serves as the program's entry point.
20#[entry]
21fn main() -> ! {
22
23 // Send message to the terminal PC/laptop
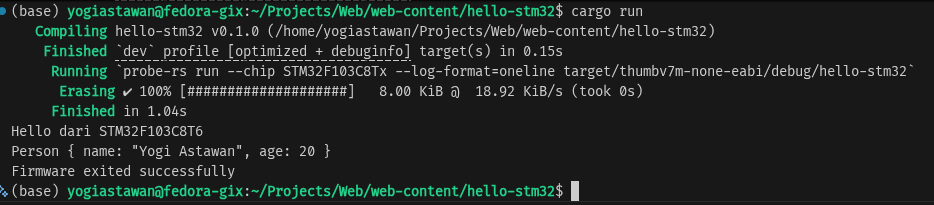
24 defmt::println!("Hello dari STM32F103C8T6");
25
26 let yogi = Person {
27 name: "Yogi Astawan",
28 age: 20,
29 };
30 // Sends formatted messages to the PC/laptop terminal.
31 defmt::println!("{:?}", yogi);
32 // Terminating the semihosting session upon program completion.
33 semihosting::process::exit(0);
34
35}Running the Rust Program on the STM32F103C8
Prior to running the created program, the ST-LINK USB Downloader Debugger and the STM32F103C8 microcontroller must be connected using the SWD interface. In this setup, I am using female-to-female jumper wires to connect the ST-LINK pins to the STM32F103C8 microcontroller pins as follows:
| No. | ST-LINK | STM32F103C8 |
|---|---|---|
| 1 | 3.3V | 3V3 |
| 2 | SWIO | SWIO |
| 3 | SWCLK | SWCLK |
| 4 | GND | GND |
Plug the ST-LINK USB Downloader Debugger into your PC/laptop’s USB port. Then, to run the program, type the following command in the VS Code terminal:
cargo run
The following is the output of the program once it is running:
The next post will cover how to debug the STM32F103C8 microcontroller and access the STM32F103C8 Input and Output pins using Rust.
Common Issues and Solutions
Some of the issues encountered while creating this tutorial include:
- Error: No connected probes were found when running
cargo run. This can be resolved by ensuring that the ST-Link is properly connected to the PC/laptop, which can be verified by checking that the power indicator lights on both the ST-Link and the STM32F103C8 are on. Replugging the ST-Link into the PC/laptop also sometimes helps.
If you have any questions, feedback, or suggestions, please feel free to reach out via the contact page.
